Let’s learn how to make a simple summer sketch for your nature journal!
Yesterday I was able to get out to my favorite secret pond where I noticed tons of cup plants (Silphium perfoliatum) growing along the edge of the water. Cut plant is pretty amazing! Its leaves form a deep cup where large amounts of water accumulate after rainfall.
So let’s get started!

Step 1: This watercolor journal is pretty small, only 7″ x 5″ (17.78 x 12.7 cm). Here I started with a sketch of the landscape on the left and a sketch of the cup plant on the right. I love when the proportions are off kilter. The cup plant is the main subject so it’s large, but I also want to include the landscape where I found it.
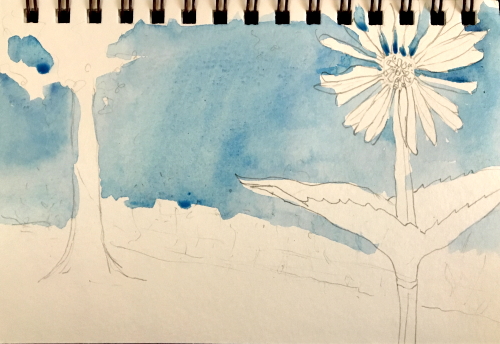
Step 2: I start with the sky using a nice deep cobalt blue color. I painted around the tree and around the petals of the cup plant.

Step 3: I mixed the cobalt blue from my palette with sepia and painted the trunk of the cottonwood tree. Next, I painted the foliage with some light green and dark green pigments.

Step 4: I mixed some cobalt blue to my dark green pigment and painted the shadow foliage on the tree.

Step 5: We are going to add shadow to the tree trunk by mixing a bit of purple to the trunk color. I did not cover the whole trunk, but skipped around allowing the “sunlit” areas to shine through.

Step 6: There’s a lot in this step but don’t worry, it’s not difficult. (Working from the bottom of the page upwards) First, using a lemon green mixture paint in front of the tree. This is where the sun is hitting the grass. Next, using a green color without yellow, paint behind the tree. Then, paint a darker green color for the plants growing along the water. If you drop some blue into this section while the paint is wet, you will have a nice variation of plant color. Finally, take a small brush with pure yellow and paint some dots above the plant line and within the plants. This represents the cup plants from a distance. Because the landscape is not the main focus, we don’t have to include too many details. That would distract us from the large cup plant, which is the main focal point.
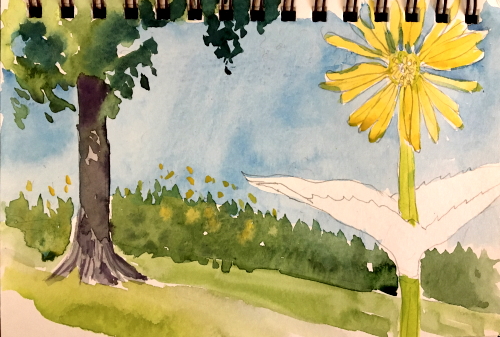
Step 7: While the background is drying, paint the petals of the cup plant with pure lemon yellow. Paint the stem (which is square) lemon yellow and light green.

Step 8: A neat feature of cup plant is that the top of the leaves which face the sky are more blue than the bottom of the leaves which are green. So paint the top of the leaves cobalt blue and a little green. You can use the same color on your palette as the shadow foliage from the tree. While the leaves are wet, take a sharp object (I used a pointed paintbrush end) and scrape some vein lines. Easy peasy.

Step 9: Using the same lemon yellow, paint every other petal to give the flower definition. Because some petals have two layers of paint they will appear much darker. In the center of the flower, paint some yellow ochre dots.

Step 10: Paint the bottom of the leaves with a green color. I think I still had some yellow ochre on my brush when I picked up some green, it made a nice combo. While the bottom of the leaf is wet, add some vein marks with a sharp object.

Step 11: In this step I was not satisfied with the bottom of the leaves. They looked too light, so while it was wet I added a bit of blue/green to just the base of the “cup”, then I painted that same color on the stem in two lines, leaving the middle of the stem light. The stem is actually in the shape of a square. I hope one day you can see it in real life. And even though the stem goes through the two fused leaves, water remains in the cup. Pretty neat!
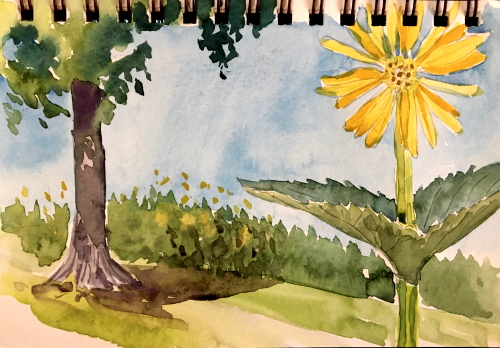
Step 12: Now it’s time to anchor that tree and add shadow. The sun is shining from the left of the tree and the shadow is cast to the right. The sun was so strong that the shadow ran all the way up the plants growing on the edge. Using purple, paint a shadow under the tree and to the right of the tree, running up the cup plants.

Step 13 Final: Because I want the cup plant to be the focal point, I outlined it with a black micron pen. I also wrote details in my nature journal so that I would always remember this day. Even though this journal sketch is quick and messy, it brings me right back to that spot where I sat in the shade on a hot summer day.
Here are the photos from that location:

There’s a lot going on here. As artists, we don’t have to include every detail. I really liked the large cottonwood tree and the cup plants growing on the edge of the pond which you cannot really see. I decided to eliminate all other shrubs and trees…too much.


Here are some detailed pics of the cup plant.
Did you know that the American Goldfinch loves the seeds from the flower head? They also love to drink the water in the leaf cups when available.
I hope you enjoyed this free step-by-step demonstration on how to paint a simple summer sketch using watercolors. Don’t worry how your sketches turn out. They are meant to jog back memories of your nature outings, not to be framed pieces of art. Have fun and enjoy playing with watercolors!


Lovely demo!!! It cheered me up today. Thank you and God bless!
Thank you Aneta, glad it cheered you up! God bless you too!
Hi Christine,
It’s Leslee from California. Hope you are doing well. Just wanted to greet you with the Lord’s blessing on your life and to let you know that you and your posts are appreciated. If I can pray for you in any way, let me know. Thank you again!
Thank you so much Leslee! Wow, I’ll take you up on that offer…if you can pray that my children repent and seek Jesus I would really appreciate it! And likewise, if there’s anything I can pray about for you just let me know. In the meantime, I’ll pray for the health of you and your family….I hear CA is on second lockdown. 😦 But God is stronger!
Wonderful! A pleasure to watch the step-by-step, and a nature walk to boot! Great work, Christine, hope this finds you well and smiling!
I am smiling, thanks Mark! I hope you are doing well, staying healthy, and smiling too!