You are going to like this step-by-step pastel demonstration of how to paint trees at dusk! This may be a little advanced, but don’t worry, with a little practice you’ll be able to handle this, no problem.

Here is my set up and reference photo. I took the photo at Goose Lake Prairie about 2 years ago. The sky is over exaggerated with the help of Photoshop, it really wasn’t that pink. That’s okay, I love a dramatic landscape. I am using an Ampersand Pastelbord as my canvas. We will start with a watercolor underwash and finish it off with pastel paints.

Step 1: On your Ampersand Pastelbord, make a light sketch with vine charcoal. My board is 11×14.

Step 2: Turn the board upside down.We are going to start with the sky. We need to turn it upside down because gravity will cause the watercolor paints to drip and we do not want any pink in the field. Spray the sky with clean water using a small misting bottle. Using rose watercolor paint, start at the horizon line and work your way down. Wait a few minutes to settle in and create a blue-green watercolor mixture using french ultramarine blue and sap green. Take a round brush and dot the horizon line. Be carefull because watercolors on Ampersand Pastelbord tend to move quickly! Don’t over paint, just dot, dot, dot. Because our board is upside down, you will start to see lovely trees practically create themselves. Sit back and take a moment to see what your paints are doing for you, it’s so much fun.

Step 3: Because watercolors dry so light, especially on the board, I made another layer of trees and added a purple color to the sky. Wait until this dries completely or if you are impatient like me, dry it with a hair dryer.

Step 4: Now we are going to start on the grasses in the distance. I made a mixture of sap green, payne’s gray, and ultramarine blue. The lightest color is yellow ochre. You only need a little paint as these colors will move around.

Here is a close-up of the background. Holy cow I love what it’s doing!!! Those lines were not purposely added but just happened on its own…yessss! Sometimes your paints will surprise you.

Step 5: Hold a piece of paper over the sky and lightly spray the bottom half of the board with clean water. Wait a second and paint the water with your sky color using a wide flat brush.

Step 6: When the water is almost dry, using payne’s gray and your purple mixture, paint the foreground grasses.
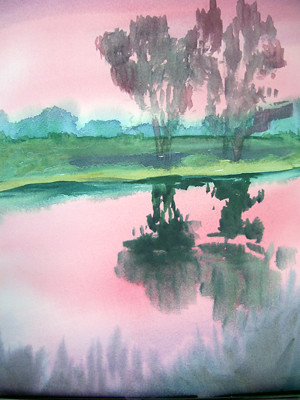
Step 7: Using the same color, paint the trees and their reflections. Most of this will be covered with pastels so don’t worry about the color. Just make sure to leave “sky holes” in your tree tops. We are done with watercolors, you can put them away now.

Step 8: After everything is dry, we will start painting with pastels. When people ask me how do I know which colors to use, I say, “I don’t know?” The one thing I do know however, is that I want to limit my colors so that my painting flows and does not look too crazy. I am mainly going to stick with pink, green, blue, and purple. Every once in a while I will stick a hot crazy color in there to create excitement…but not too much. Because the light is coming from behind the trees, I stared with a little bit of orange pastel on the edges of the trees and sky holes. Next I filled the trees in with a light purple pastel. This too will be mostly covered so I don’t care what it looks like right now. I can’t tell you how many times when painting, that I was almost in tears before I was even half way done. Your painting never looks the same when it’s finished, just wait and see it through.

Step 9: Layer the tree with the darkest blue pastel you have (Unisons are great for darks) and then a medium sap green color on top. Don’t forget to leave some sky holes open.

Step 10: Fill in the distant grasses with medium and light green pastel. I won’t cover the whole canvas, but I will make sure to let some under painting show through. Using a dark green pastel, paint the reflection of the trees in the water.

Step 11: Oops, I realized my tree reflections were way too long. No worries, just take some pink pastel and cover up some of the tree reflection in the water. Pastels are way more forgiving than watercolors. I also added some light purple pastel in the water and drew in some foreground grasses with dark blue and dark purple pastel.

Step 12: Using the side of a light pink pastel, lightly go over the tree reflection in the water in an up then down pattern. Don’t press too hard, we don’t want to cover the reflection completely, just make the appearance of water. Using a medium green pastel, make some blades of grass in the front.
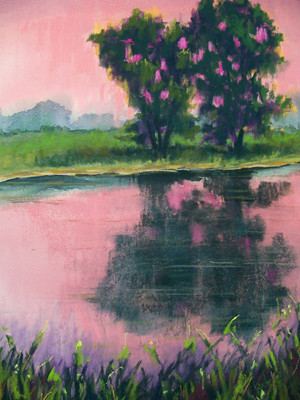
Step 13 Final: With a light gray pastel pencil, draw horizontal water lines through the tree reflections. Lastly, with a yellow pastel pencil make highlights on the grasses in the front for some POP!
“We Enter Night Together”
11×14
pastel
When I name a painting, I want to express a feeling. I want the viewer to come to his or her own conclusions when viewing, but I want to help them experience what I was feeling when out in nature. To know there’s something bigger than myself out there gives me great comfort. To know that I am never alone gives me even more comfort. I named this painting, “We Enter Night Together”, because the two trees stand side by side through everything. Maybe you are going through some rough times in your life and do not have many friends nor family that can go through it with you.
Take comfort, you are never alone.
“And the Lord, He is the one who goes before you. He will be with you, He will not leave you nor forsake you; do not fear nor be dismayed.” Deu 31:8
When I saw those trees, that scripture came to mind. Great comfort.
I hope you enjoyed this step by step pastel demonstration on how to paint trees at dusk. To purchase the original click here, it will take you to the available original pastel page.
To purchase a print:


As always, you make it look so easy! Personally I hate titling artwork, so I tend to go with something obvious & generic (except in the case of abstracts, when I’ll usually use the 1st thing that pops into my head, thus “K12,” “421,” etc.
Lana: Titling is HARD! It’s like naming your children…you want it to count.
Thanks!
lovely work christie——–u make it so easy……..