Okay Folks, the Holidays are over and this is a brand new year with bright brand new beginnings. So lets get crack-a-lackin’ and get serious about our artwork!
Today we will learn how to paint a pine tree with soft pastels….

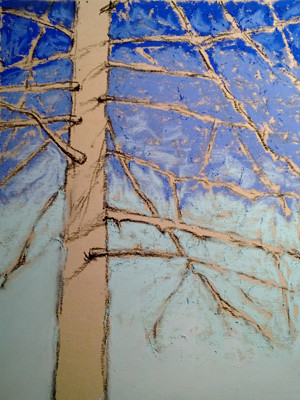
Here is my reference photo. This photo was taken at the Morton Arboretum in the Spring of 2009. I love the sky color peaking through the boughs and the bright sunshine on the trunk.

Step 1: Make a sketch with charcoal on Ersta pastel paper (looks and feels like sandpaper). My paper is small 7×9 inches. I am remembering to use good composition by not placing anything dead in the center (remember the word dead. Dead = Don’t). I have my trunk 1/3 of the way from the left side of the paper and many smaller branches covering 2/3 of the paper.
Step 2: I did not make an underpainting. This is an all pure pastel painting. At the very top lay down some dark blue pastel, I used Unison BV12. Next color down, paint with a medium dark blue, Rembrandt 506,7. Next down paint with medium light blue, Rembrandt 570,9 and the very bottom light blue, Rembrandt 506,9. Even though I am giving you the brand and number pastel I used, you can use whatever colors you have or like. There are no rules.
Overlap the colors a bit, it helps to transition the next color.

Step 3: Smooth with fingers…make sure your hands are clean…sounds like Mom? Using the darkest blue you have, make some thin branches near the top of the painting and a few in the middle (these are the ones in shadow). Next, using a light purple, paint in some background pine boughs.

Step 4: With a dark blue, make some closer pine boughs. Keep this light and airy making sure to leave spaces open in between pine needles to see the sky/background.

Step 5: Paint the trunk thinking of sunny bright colors. I used mostly orange/brown Rembrandt 236,3 and a few touches of olive green Rembrandt 202,3 and light brown Rembrandt 231,3.

Step 6: Hold on to your seats, here comes the fun part Folks!!! In nature, when you look at something, let’s take a tree trunk for example, you look at it and your brain says, brown. But it’s not just brown. It’s reflecting many, many colors that your brain doesn’t process. Take a long look at a tree trunk and see if any MORE colors pop out at you. In our painting we got them right here!
Add some vibrant color branches. Go ahead. Get a little crazy. I used red/purple Rembrandt 347,5 and red/brown Rembrandt 538,5.

Step 7: Make some lovely shadows on your trunk. I used a Carbothello pastel pencil #770 (dark purple). This step gives great depth!
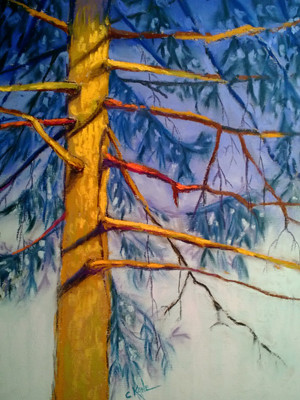
Step 8 Final: Kiss it with the sun! Using a bright yellow/orange Unison, I painted selective parts of the trunk and some top branches. Next I used some blue sky color and added some sky “holes”. Lastly I took my Carbothello pastel pencil #760 and 770 and made some really thin bare branches. And we are done!
I really hope you enjoyed this free step by step demonstration on how to paint a pine tree using soft pastels. Try it yourself, it is not as hard as you think.
Original painting sold on Etsy. Click here to view.
Archival prints/framing/greeting cards sold on FAA. Click here to view.
Thank you to all who have faithfully stopped by this site to learn how to paint and wish me well. Let’s make 2013 the year to paint!


wow!
Thank you 🙂
Thanks for sharing and inspiring. Pastels are new to me, and I received Rembrandts for Christmas.
Oh yay!!! Art supplies for Christmas….ooooo…ahhhhhh 😀
I think you will love pastels. It’s feels great to control that pure pigment in you hands!
Hi. I love the reds on those branches. Jane
Thanks, a real easy way to get the sun on there!
Inspiring! You make me want to experiment. Your pine tree from this point of view reminds me of playing under the spruce tree in my mom’s backyard!
Thanks Michelle! I have fond memories of playing in nature too.
What a superb tutorial!! Thanks so much for sharing. What a delight to see such a lovely painting evolve. You have demonstrated that good art is not just about desire and having an artistic sensibility, but requires basic skills and the mastery of technique– an important lesson indeed.
Great post, Christine– the concluding steps were truly dazzling. Wishing you much happiness and success in the coming year. : )
Thanks Mark! I wish you much success and happiness this year…I have a positive outlook for both of us!
😀
Just want to say thanks for posting these step-by-steps. I stumbled across them in my search for pastel tips. They are super helpful and fun to read!
Thanks Elle! I’m glad you are able to use them 😉